
Who hasn’t heard that a good way to satisfy end users is to deliver them solutions that make their life easier ? In JIRA, when configuring a new workflow, this principle translates into helping users understand the gist of the workflow at a glance. Here are two visual tricks that can help you achieve just that : reorganising transition buttons and signposting them.
Reorganise your transitions
In each status, make sure that you order the outgoing transitions in a logical order, from the most positive hypothesis to the most negative (or unlikely). For instance : 1°) Approve 2°) Request information 3°) Reject.
Bring this consistency across the workflow by applying the same logic to every status.
How do I control the order of transition buttons ?
Each transition can be given a property key which allows you to reorganise all the transitions outgoing from a given status
opsbar-sequence = n (the position of the transition button)Transition property key: opsbar-sequence
- Do not choose 1, 2, 3, etc. as values of the property key opsbar-sequence, but rather 10, 20, 30 etc. : if new transitions are added to the workflow later on, you will have room to insert them between existing transitions (eg. with opsbar-sequence = 15, 25 etc.)
- If there is a global transition or a common transition in the workflow, assign it an opsbar-sequence value which sets it in a logical manner on every status.
Signpost your transitions
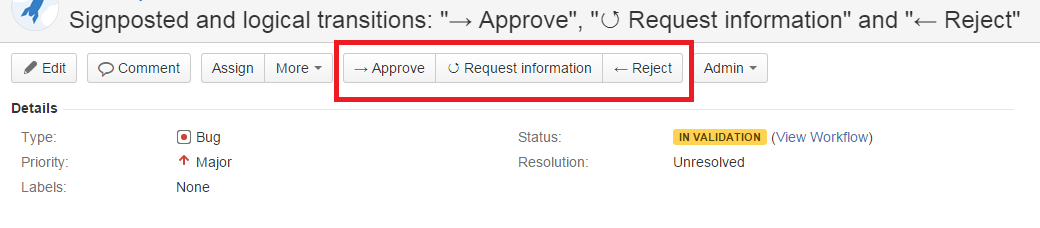
JIRA interprets all Unicode blocks, including arrows. This enables us to prefix the name of each transition with a symbol evocative of either moving forward (→), stepping back (←) or standing still (↺)
Here is an example of a View screen :
Resources
You can find here is a table of Unicode arrows to copy/paste signposts from, and you can refer to Atlassian documentation about transition properties in JIRA workflows for more details.


