Getting set up with Jira on Cloud today can be done in minutes, and Jira Service Management is incredibly flexible to adapt to different needs. You can create projects for multiples teams and objectives in a few clicks. But sometimes that freedom leaves users, whether customers or agents, a bit lost. What if customers regularly leave out important details when raising requests through your portal? Or if troubleshooting a request requires following a specific procedure? Some structure could help. No matter how you need to guide users or add structure, Elements Checklist can help organize information in Jira without any clutter. Let’s see how the app works to add a form to a customer portal, add a table grid to issues, and >to provide checklist templates for support agents.
Add a form to your Jira Service Management Cloud customer portal
Your Service Management portal is set up to manage service requests from employees, perfect. But how to add a form to your customer portal so users can submit details? With Elements Checklist, you can create a form with multiple attributes and add it to specific request types to guide users. You can either use a template to insert preset data or let users add entries.
For example, users can submit details when creating a request, and their needs are organized in a table in the request form. When used as a form, Elements Checklist lets users add as many rows as they need.
For the person working on the request, it’s easy to update the user on the status of each item requested. This example uses a select list attribute for the status field, so it’s fast to update each row of the form.

And what does that look like on the customer portal? Updates made in the agent view are visible on the portal.

By adding a form to your customer portal with Elements Checklist, the information you need is collected, and it’s easier for both customers and agents to see at a glance the progress on the request.
Add a table grid to your Jira issues
Looking for how to collect and organize data in a table in a Jira issue? Instead of creating multiple custom fields, use Elements Checklist to add a table grid.
With Elements Checklist, you can save information in rows and columns like a table; the result is less clutter and better-organized information in your issues.
For example, you could use a Checklist to easily organize details from an inventory check like the office location, date, and comments:

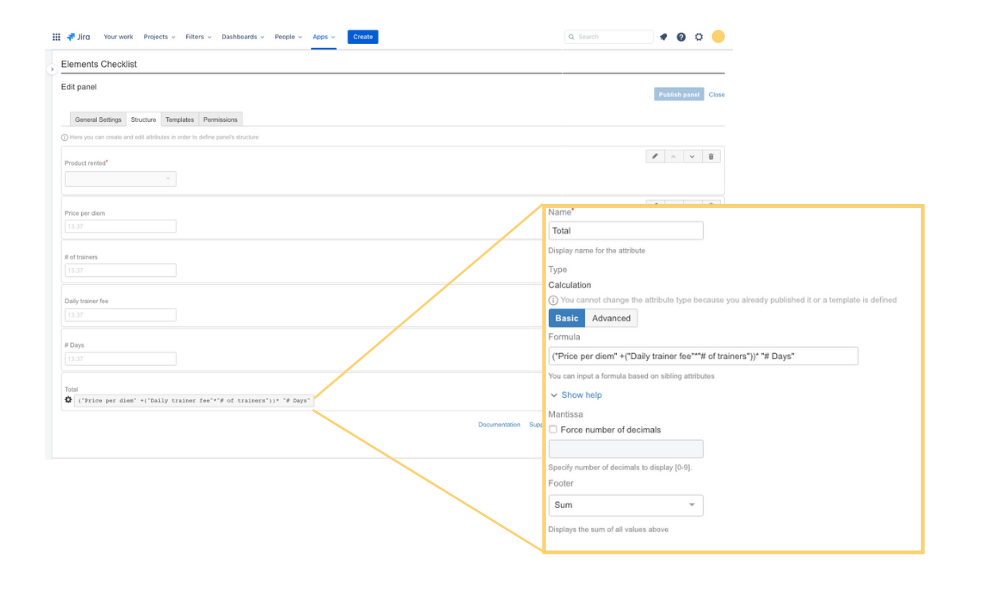
Or you could add calculated attributes to keep track of costs. You can calculate a cost per row, for example quantity times price, and also add a footer to the Elements Checklist for a total of all rows.

Setting up an Elements Checklist like a table grid is straightforward and uncomplicated. To obtain a calculated result like in the example, a basic formula was used in a calculated attribute. Logical expressions are possible too to create more advanced formulas in your table grid.
Use checklist templates to create standardized procedures for Jira Service Management agents
There’s a reason pilots and surgeons use them: checklists help your brain focus on the task at hand, but more importantly prevent you from accidentally skipping over a step. For support agents who are regularly fielding similar requests, a checklist makes sure everyone is following the same procedure.
To insert standardized procedure checklists into tickets, Elements Checklist templates are the solution. This could help IT support agents with common tasks like installing a new computer which has several specific steps for configuration, hardware troubleshooting, or account creation steps for a network account.

If you need to comply with industry standards or a quality certification, checklists are an easy to implement solution so all your support agents can easily confirm they are following a standardized procedure.
Make Jira work for you with forms, table grids, or checklists
No matter how you need to guide users or add structure to your Jira Service Management, Elements Checklist can help. By adding a form, table grid, or checklist, you improve the amount of information in the issue and guide both customers and agents. You’ll have less clutter from custom fields or over-long descriptions, and easier management of your issues.
Do you want to implement Elements Checklist? We can help you configure your app and your Jira to make it a success, using the best practices. Tell us more about your needs here.